Nitrox/Enriched Air Do you Need it?

The Nitrox/enriched air certification is probably the most common specialty certifications that divers get, it is quick and easy all classroom no required dives, and can be completed in an hour or 2. But I think a lot of divers are oversold and misunderstand Nitrox. This post is meant to talk about some of the benefits and uses of Nitrox and some of the misconceptions. Hopefully to help new divers make a more informed decision about if getting Nitrox certified is worth their while.

  • What is Nitrox/Enriched air? To put it simply Nitrox is any mixture of air where the percentage of Oxygen is above 21%. Most of the time the standard mixes for Nitrox are 32% and 36%, 32 being the most common.
  • What is the benefit of a higher percentage of oxygen? By increasing the oxygen in the air it reduces the percentage of nitrogen, this means that while diving the divers body will absorb less nitrogen.
  • What is the advantage of less Nitrogen absorption? Certified divers will know that during a normal dive breathing compressed air our bodies absorb nitrogen into our different tissues and this takes time for the nitrogen to work its way out. During the dive we keep track of our No Decompression time (this is an estimate of nitrogen absorption based on our depth and time underwater) the deeper you go and the longer you stay underwater the more nitrogen our body absorbs. This nitrogen can get trapped in the body in some circumstances causing Decompression sickness or the “bends” caused by nitrogen bubbles expanding during ascent and getting stuck. So by reducing the amount of nitrogen in the gas we are breathing we reduce the amount of nitrogen we absorb on a dive. This extends our potential No Decompression time while diving. In addition to potential longer No Deco times the time between dives “surface interval” is shortened because there is less nitrogen for our body to off gas after the dive before we begin the next dive.
  • When is Nitrox Useful? Nitrox is most useful when divers are completing multiple dives in short durations, like of dive trips where somebody might do 2-4 dives in a day over multiple days in a row.
  • Additional benefits to Nitrox. Another common reason for divers to prefer Nitrox is because it tends to reduce the amount of fatigue after diving, the built up nitrogen after diving generally causes fatigue and many divers claim that diving Nitrox especially on repetitive dives reduces this feeling. Nitrox tends to be a popular option for older divers that are more affected by fatigue, because of this it has gained the nickname “Geezer Gas”

Common Misconceptions about Nitrox.

  • You can dive longer on Nitrox. This is something I hear generally from new divers or people that are being sold the benefits of Nitrox. Yes you will have more No Deco time while diving on nitrox but you will still consume air at the same rate as regular air. So you do have the potential to dive longer but if you are looking for a solution to being an air hog underwater Nitrox will not make a difference to your actual dive time.
  • You can dive deeper. This is something divers that have not been Nitrox certified believe, because of the increased percentage of oxygen in Nitrox your max depth is actually reduced for a standard 32% Nitrox blend your max depth is reduced to about 110 ft instead of your recreational max of 140ft on regular air. This is due to the potential for oxygen toxicity due to the higher concentration of oxygen at depth. So as you increase the percentage of oxygen in the blend the shallower your maximum depth is.
  • You can fill any tank with Nitrox. Yes any new tank can be filled with nitrox but those tanks should be clearly marked Nitrox only with a large green and yellow sticker (in the US). Because oxygen supports combustion, contaminants must be cleaned from tanks before filling with oxygen, there are different methods of filling tanks for Nitrox a common method is Partial pressure blending were a tank is filled to a calculated pressure with air then pure oxygen is filled to increase the percentage, because pure oxygen is being filled into the tank there is a combustion hazard if the tank is not filled. With this being said tanks that are not marked for Nitrox or have not been O2 cleaned should not be used to fill with Nitrox.

In my opinion for most divers Nitrox isn’t really necessary, of course it depends on the circumstances of the dives/trip and there are situations where it is called for. When should you consider Nitrox, trips with multiple days of diving with multiple dives a day, preferably shallower dives, or if you feel extreme fatigue after diving. When is it not necessary for deeper dives, single tank dives, or most single day diving excursions.

I always find it funny to see people diving in cold water with Nitrox tanks, especially at training sites that don’t get deeper than 50ft and you can see the entire site in under 1 hour, most of the time it is not the deco time that is affecting the length of the dive it is body temperature and air consumption, two things Nitrox has no effect on. The other thing to keep in mind is that obviously because of the process to fill Nitrox it is more expensive to get Nitrox fills or rent Nitrox tanks, so people are paying more for the sake of paying more. So I find it unnecessary for most cold water diving situations. It is common to see instructors teaching classes using nitrox and this I can only assume is a sales techniques to convince students to take the class.

So finally, should you get Nitrox certified? If you think the benefits will be to your advantage then yes. It is a short class that is usually pretty inexpensive compared to other specialty classes so if it is something you think you will use go for it, but it probably won’t have as drastic effect on your diving as your instructor may be selling you.

Advertisement

Diving In Santa Cruz

There is NO good diving in Santa Cruz. While it is possible to dive in Santa Cruz it is shallow diving and the visibility is very poor. Running a dive shop based in Santa Cruz I get a lot of calls about people that want to go diving here. Hopefully everyone searching for diving in Santa Cruz will find this and save themselves some disappointment.

Why we don’t dive in Santa Cruz: Despite being relatively close to popular diving areas like Monterey and Carmel, Santa Cruz is very different in terms of what is going on under the water. The first thing to know is that it is very shallow in Santa Cruz, max depth off shore within a swimmable distance is only going to be 15-30 ft. While some divers might not have an issue with shallower dives, the other issue this presents is the waves (the reason Santa Cruz is known for surfing). Because of the shallow water there are more waves that break farther out stirring up more sediment on the bottom and increasing turbidity. This also makes it more difficult and dangerous to enter and exit the water. The other main issue is the visibility, because Santa Cruz coast line mostly consist of silt stone and mud stone, there are very fine particle in the water that are not conducive to good visibility. While on rare occasions the visibility can be decent most of the time it is roughly 2-7 ft. The last reason that we do not dive Santa Cruz is the structure, while there is structure usually marked by kelp is is low lying structure and once again mostly mud stone, so breaks off easily and clouds visibility, for the most part its is also a lot of sand which for recreational diving is not very exciting.

In Conclusion, it is not worth it to go diving in Santa Cruz. Dive shops will not take you diving in Santa Cruz, because the diving is NOT GOOD. If you are interested in diving, Monterey and Carmel are where you want to dive, thats not to say that you shouldn’t support Santa Cruz dive shops but that is where we go diving.

Dive Computer Buyers Guide

The dive computer can be considered one of the most important pieces of equipment after the regulator of course. But in recent years the days of RDP tables have fallen by the waist side and dive computers have become a standard and almost essential piece of equipment. With that being said there are a lot of different options for dive computers and choices that you as a diver must make to have the computer fit your style of diving. In order to cover what I find are the important features of dive computers we will disregard brands, most brands make all of the styles of computers I will be discussing and will have minor differences in user interface, and algorithms, they will all have the same functions for the most part. In order to cover the topic of computers I will break it down into multiple considerations; price, style, and features.

PRICE: This is usually the first consideration that a diver must make, what price range you are able to afford will vastly narrow or widen your options in computers both in style, features and functions. There is a pretty wide range of prices for dive computers with your entry level computers starting around $300 and your high end computers reaching up to $1500 and plenty of options in between. With the lower cost computers you will usually get a very simplistic design, 1-2 button navigation, basic settings that can be adjusted by the user, and the basic digital display. The high end computers it is very common to have a full color display, bluetooth interface to adjust settings and download dive data, rechargeable batteries, air integration, and a variety of different user customizable settings. Keep in mind that the cheap computer and expensive computer will both provide you with the same information while diving, depth, time, no deco, max depth, temp, etc… Another thing to be aware of is with brands the expensive computer will be using the same algorithm for determining no deco time as the cheap computer.

Styles of computers: There are two basic styles of dive computers and in each of those styles there are sub categories that will affect the price of the dive computer. Every diver will have their preference, and these include Console and wrist.

Console Computers: For these computers you have the option of standard console with a puck and air integrated console.

  • Standard Console with a puck: This type of computer is the most commonly encountered in rental departments in dive shops. These are usually entry level pricing about $400-500 because you are getting a pressure gauge with the computer. The configuration includes, a pressure gauge inside of a rubber or plastic boot with a removable puck dive computer, and possibly a compass. These are a standard configuration with the dive computer being completely removable from the unit, they are essential 3 parts, pressure gauge, computer and compass held together in a housing. This is nice to have everything you need in one central location, it is attached to your regulator via the pressure gauge so you can’t forget it and is easy for new divers to get acquainted with the location of pertinent information while diving.
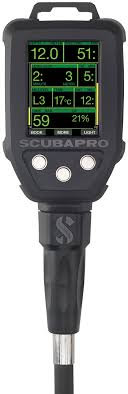
  • Air integrated Console: These generally fall into the higher end price of dive computers, $700 and up generally. Like in the name the computer has air integration so there is no more traditional pressure gauge, it is now a digital readout. This make air pressure much easier to interpret than a traditional gauge, with a fairly exact number given. Another added feature of air integrated computers are estimated air consumption. These computers in addition to your no deco time will factor in how quickly you are consuming air and give you a countdown of how much time before you consume all of your air. While this is not a necessary feature it is nice to have that information especially when navigating or making your turn to head back to the shore or boat. The biggest downside to air integrated dive computers is if the battery dies or computer fails the diver has no way of knowing what their air pressure is, this is very uncommon and the computers are very reliable, some divers will have a back up pressure gauge on their regulator for piece of mind.

Wrist Computers: these are popular options for divers that may not be ready to purchase their regulator yet or don’t plan on purchasing a regulator and want a personal computer for travel, there are 3 styles, puck, wrist watch, and Air integrated/Transmitter.

  • The puck: this is the cheapest version of a dive computer that can be purchased from any brand, usually in the $300-400 range this is the same puck as the console computer but instead in a wrist boot. A diver could if they wanted to purchase a puck in a console and a separate wrist boot and switch the computer back and forth depending on their diving situation. These are good for divers that want a computer but not all the other stuff ideal for travel and people that don’t want to deal with the regulator. These are very simple 1-2 button navigation through menus and very good option for a diver on a budget.
  • The wrist watch: these are dive computers that double as a digital watch, they are generally not much bigger than your standard digital watch, and many are very subtle and fashionable. These types of computers have a wide range of prices because they can vary from very simple to very technical, entry level dive watch computers start around $400 and the high end computers can reach up to $1500 like the Garmin MK2i. Some of these computers are capable of being air integrated using a transmitter, and some are just a smaller more compact version of a puck. If you are a person that likes to ware a watch this may be a consideration offering many different styles and price ranges, many these days will also have changeable wrist straps to customize to the user.
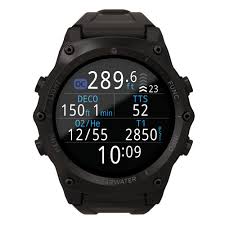
  • Air integrated/transmitter: These tend to be the higher priced computers because they have the most features packed into them, keep in mind many of these computers can function as a normal computer without the transmitter, but will the transmitter will allow for air pressure to be displayed on the computer. It is also common for these computers to have full color displays making them very easy to read while diving. There has also been an increase in computers in this category to have rechargeable batteries given that the color displays tend to use more energy than the standard digital displays. Like I said for the wrist watch style there are computers that are small and compact like watches in this category and there are also large blocky computers with large displays in this category, while the wrist watches tend to be slightly higher priced because it is the same tech in a smaller frame. Keep in mind with air integrated wrist computers they do not generally come with the transmitter, that usually has to be purchased separately and the standard price for a transmitter is $400, and they are brand specific, so make sure if you do not purchase them together you get the correct one for your computer.

Features: this is something that at this point in time most computers will share a lot of features as technology improves. Many common features to consider and check weather these features are important to your style of diving.

  • Nitrox: This is a very common features and almost all modern computers are Nitrox compatible, usually up to 40%, some higher end computers that are dual purpose, recreational and tech diving will be compatible up to 100%. These will adjust algorithms for higher concentrations of Nitrox. NOTE: no computer that I am aware of will test the air for Nitrox, the diver must test the air separately to get oxygen concentration and enter that amount into the computer manually.
  • Dual Algorithms: most dive computers use a single algorithm designated by the brand manufacture, some are more conservative than others reducing the no decompression limit. Some dive computers (Oceanic in all computers and Suunto in select computers) allow the user to chose between more conservative or liberal algorithms depending on their diving style. This is not usually a feature that matters that much but if you find your computer is giving you significantly more or less bottom time than your buddy it might be a feature to consider.
  • Display: this is a feature that tends to change with age. As divers get older finding a display that is easily readable becomes more important. Large, or color displays tend to be more important for divers as they progress in age, these features tend to increase the price in computers with color displays on the higher end and larger displays in the mid range.
  • Navigation buttons: this is a personal priority of mine, especially after helping students with very basic computers. Dive computers with have from 1 to 4 buttons to navigate the menus and settings. With single button computers you press the button to advance the menu and hold the button to select. This can be tiresome when changing settings and if you miss a setting you have to cycle completely back around. Two button navigations are more common in newer computers and have an advance and select button reducing the likely hood of accidentally skipping the setting you want. Three button computers are generally higher end computers that have advance, select and back buttons making navigation very easy. Most 4 button computers are wrist watch style with the 4th being a backlight, and some computers like the Oceanic ProPlusX, and the Atomic Cobalt that have more elaborate menus.
  • Alarms: the amount of alarms a computer has will depend largely on how much integration it has, it is common for basic non integrated to have depth, time, and no deco alarms. While an integrated computer will also have air pressure alarms and time remaining alarms. All of these can be turned off and adjusted for personal preference.
  • Battery: this is a feature that many don’t think of until its time to change the battery. There are 3 different types of computers when it comes to battery, user changeable, manufacture change and rechargeable. Most high end computers will be rechargeable, while more basic computers are now more commonly user changeable especially the puck computers. Many of the wrist watch computers are manufacture battery change and will often require pressure testing after the battery is changed. Be aware of the method your computer will be and if it is user changeable make sure you have the right battery as a spare, most puck computers use the CR2450 coin computers, this is the most common.
  • Digital Compass: this is something that is usually only found in higher end computers that have the intention of simulating the traditional compass and reduce the need for additional equipment. Digital compasses are fairly accurate, but usually need to be calibrated before hand and if you haven’t will be less useful. I find this to be a nice feature but despite having it on a couple of my computers past and current I don’t generally find myself using it and prefer to rely on a more traditional compass.

I hope this is useful for any divers considering purchasing a computer, weather it is a replacement for an old outdated computer or their first computer. Computers are very important pieces of equipment that I believe all divers should have.

Guide to Central California Shore Diving (Monterey & Carmel) Dive Sites Ranked

There are dozens of dive sites in our local area all with their own features that make them unique.  Wether you are diving, or freediving these are all sites worth checking out.  This is going to be a down and dirty guide to the well known sites in this area, best way to reach them and what to expect.  I will be doing my best to rate these sites in terms of ease of diving and quality of diving.  The sites will be listed in order of easiest to hardest to dive and a score out of 10 will be given for the quality of diving.  Obviously these are objective opinions based on my diving experience in the area but I feel I have a pretty good feel for many of these well known dive sites.

Monterey:

  1. Breakwater/ San Carlos Beach:  (4/10) This site is probably one of the most well known dive sites in central California, and the primary place for dive shops to conduct certification dives.  It is a very easy entry into the water and the location is tucked into Monterey so only the largest swells prevent diving.  There is a lot of sand at this site and divers will only have 3 options to explore the wall, middle reef, and the pipe/ medtridium fields.  For first diving experience or first California diving experience this is a good ice breaker but due to the high volume of divers, and silty bottom this dive site is more like a bunny slope, a good taste of diving but will not leave you satisfied like other sites.  Breakwater does actually have a decent variety of fish and creatures to see but does not have the volume of life that other sites have, it is one of the best places to have an encounter with Sea Lions though.  If you are new to diving or conditions are not looking great this is the place you will probably dive.  Average Max depth 40-50ft.
  2. Maccabee Beach: (6/10) This dive site is located between Breakwater and the Monterey Bay Aquarium.  It is a moderately protected location but does get more waves than Breakwater.  The bottom structure is more interesting with much more rock structure, thicker kelp forest and old pipes and chains left from the old canneries.  If you are able or willing to swim out or have access to a boat there are some deeper rock structures large boulders that have large crevices that ling cod and cabezon like to occupy.  There is still a fine sand at this site so it can get stirred up but generally less divers so it doesn’t feel so crowded.  Average Max depth 35-80ft depending on where you go there are plenty to see in the shallows.
  3. Otter Cove/Lovers Point: (6/10) This dive site is unique because on the western side of the point which otter cove is located fishing/spearfishing is allowed.  This makes it a popular dive site for spearfisherman especially when the swell is a little rougher.  there are multiple entry points with stairs down to small beaches.  This dive site it is best to focus on the center of the cove where most of the structure and kelp is.  It does stretch a good amount of distance but is speckled with low rubble and mini pinnacles throughout.  This is a great place to get into the kelp and just wander.  The deeper portion of this site turns to sand so if your are looking to simple navigation you can stick to the outer edges.  Average Max depth 40-50 ft.
  4. Coral St/ Chase Reef: (7/10) This site is located just before Point Pinos and is much more subject to swell affecting its dive ability.  When it is dividable I believe it is one of the best shore dives in Monterey, There is a bit of a swim to get to the more interesting structure but well worth it.  The kelp forrest at Chase Reef stretches on and on and has a huge abundance of life.  This site is similar to Otter Cove in the low lying rubble with pinnacles scattered about but the pinnacles are much larger.  This site also gets much deeper than lovers with the shallower portions about 35 ft and can get deeper than 90 ft.  A very good quality dive site but more dependent on the swell than the others listed so far.  This site is best suited for more experienced divers.

Carmel:

  1. Still Water Cove/ Pebble beach: (7/10) This dive site while it is accessible from shore it is an extremely long surface swim.  To be honest if you don’t have a boat or a kayak you should not consider this site.  But if you are willing to attempt it you will find just beyond the first set of rocks out from the pier there is some wonderful structure with canyons and pinnacles, tons of kelp and plenty of fish.  Even Farther out there is Peekaboo rock which is were you can reach some real depth, and if you are lucky can find some of the large swim throughs in the reef.  This site is really broken into 3 parts the interior bay between the rocks and the pier, outside of the rocks and peekaboo.  Max Depth for interior are about 15ft, you want to get outside the rocks, beyond the rocks it drops to 40-60ft, and at peekaboo it can get deeper than 100ft.  Once again this is a site best suited for a dive kayak or boat.  Biggest benefit to this site is it is south facing and usually protected when many other sites are blown out by the swell.
  2. Butterfly House/ Carmel River: (8/10) This may be one of the more iconic sites in carmel marked by a house on the coast with a scalloped roof that looks like wings.  There are multiple entry points and limited parking, so getting there early is key.  This dive site has plenty of Granite structure with kelp pinnacles and canyons with depths that range from 20ft-90ft.  In my opinion it is best to enter from the rocks on either the left or right side of butterfly house and to explore from there entering on the beach there is a long swim and lots of bull kelp to fight through to get to some of the better structure.  The biggest down side to this site is its location, it is situated in such a way that regardless of swell direction it tends to get hit no matter what.  This site is best dived when the swell is very small, which can be tricky to get the timing right.
  3. South Monastery: (9/10) This dive site is one half of probably the most infamous sites on the central coast, its steep burn, large particle sand, and shore break can be deceptive to divers that are not familiar.  But learning how to dive this site provides vast rewards.  The South side of the beach is usually a little calmer being tucked in the southern corner of the Carmel Bay.  There is great structure but usually requires a longer swim to get to the more interesting locations, but provides a very large area to explore.  You will need dozens of dives to truly explore the vastness of South Monastery, this is best explored with kayak, but a fair amount can be done with surface swim for the devoted.  The farther around the corner you explore the more extreme the structure get with canyons, valleys and pinnacles all over.  Large fish are a common site because it is part of the Point Lobos MPA so No Take of any fish, invertebrates or shells.  This site is best capitalized on a south swell, this will provide adequate protection to easily enter and exit the water.  Also for dives at Monastery south or north always be prepared to exit the water using the Monastery Crawl if you don’t know about it you shouldn’t be diving at Monastery.
  4. North Monastery: 9/10 This like South Monastery has all of the same hazards for diving and is best avoided if there is significant swell, even if the waves don’t look very powerful they are deceptive and will even give seasoned divers trouble.  Beyond that the North site has a much smaller footprint, with a reef that can easily be fully explored in a handful of dives.  It does get deeper much faster reaching the northern end of the Carmel trench within swimming distance giving access to deep dives very readily max depths can be more than 120ft although the most interesting stuff can be found between 20-60 ft.  There is plenty of kelp and rock structure at this site with more big fish and usually a school of blue rock fish.  Most iconic kelp pictures taken in Monterey/Carmel that are published are taken at North Monastery, when you dive there you will see why.  This is a very difficult site if you are not familiar with this beach, so it is best to make sure your first dives are with someone that is familiar with diving this beach.
  5. Point Lobos: 10/10 This is the best place to dive if you are able, with that there are some things to be aware of, you need to make a reservation to dive Point Lobos, and you must dive with a buddy.  The reservations require that 2 divers are signed up. This site does have a very easy entry a boat launch ramp, but it can be slippery so watch your step.  The entry point in whalers cove is very protected and usually the easiest place to dive in all of Carmel.  There are 2 diving areas Whalers Cove, and Bluefish Cove.  Whalers is very easily accessed with nice structures canyons, walls, pinnacles and lots of kelp, getting moderately deep at about 70ft.  If you are willing to make the swim or have a kayak, Bluefish Cove is by far one of the best dives on the central coast.  Bluefish offers more extreme structures, deeper water, more fish, and stunning colors.  You can easily find yourself deeper than 100ft but the best stuff is in the 40-80ft range.  An amazing dive site that is perfect for photography with dramatic structure and an abundance of life.

There is no doubt that Monterey and Carmel Have amazing diving, if you enjoy shore diving these are some great sites worth checking out.  Make sure if you are unfamiliar with diving this area it is best to dive with someone that is or hire a guide.  Many of these sites can be difficult to dive depending on conditions so it is best to consult with your local dive center to determine when to experience some of the more difficult dives.  With that being said in diving there is also no guarantees so surge, visibility and fish density can change from dive to dive, so experience these sites as much as you can to get all the best they have to offer.

Happy Diving everyone, Be safe and blow some bubbles.

How to Deal with Seasickness

This is going to be short and sweet to avoid reading through all the filler simple effective way to deal with and avoid sea sickness.

  1. Purchase over the counter motion sickness medication. (bonine, dramamine, etc..)
  2. Take it the night before your water excursion, ideally before you go to sleep to take advantage of the drowsiness caused by some of the medications. This will help get the medication circulating in your system.
  3. Take the medication again in the morning before your water excursion, keep the medication in your system and retake again if a prolonged excursion.
  4. During steps 2 and 3 avoid overly greasy fatty foods keep meals lite and basic if possible, and stay hydrated.

Thats it take the medication the night before and the morning of and should greatly increase effectiveness of them. Good luck and enjoy your ocean adventures.

Why You Should Take A Freedive Class

Freediving while not a new sport has been steadily growing in popularity, and soon i believe that like scuba diving resorts and charter boats will begin requiring free divers to show proof of certification. Up until recently free diving was largely unregulated, many major certification agencies did not offer a free diving certification and the ones that did exist focused on competition free diving. But as interest in the sport grew and its versatility mainstream organizations have adopted and developed their own programs to help new free divers be safer in the water.

First, what is free diving? Freediving is essentially extreme snorkeling, my instructor will hate me for saying this but it really is. With the use of minimal equipment, mask, snorkel, long fins, and weights, maybe a suit free divers hold a single breath and explore the underwater world. These dives can vary depending on the skill of the diver from 20 seconds to up to 2 minutes or more for a very skilled diver. Many times the free diver will have additional objectives while diving, hunting, gathering, reaching a certain depth to better their personal best, photography, or just enjoying the underwater environment.

Why don’t people take free diving courses? The main reason for many people not taking a course is because for a long time there weren’t any readily available. Most places also don’t have any regulation on being certified which I think will be changing in the near future. Because there aren’t regulations like scuba all you need are the basic pieces of equipment to get started which if you are a diver you probably already have. The equipment for free diving is more specialized long fins, open cell wetsuits, low volume mask, but generic dive fins, mask and suit will work for a new diver. Many free divers that are not certified have either learned from a friend or have just figured things out on their own, which in some cases can lead to unsafe diving habits.

Why you should take a certification class? Besides a good way to support your local dive shop, if they do offer classes it is a way for you to be a safer diver in the water. there are many subtle things that can be learned in a course that will greatly increase your abilities in the water.

  1. Proper weighting: this is a huge problem for old school divers, often over weighted to make getting down easier it make it more difficult and more effort to get back to the surface and stay on the surface. This means if a diver blacks out under water they may not be positively buoyant and they will not float to the surface. Courses teach how to properly weight a diver and how to use technique to overcome the surface buoyancy to reach neutral under water with minimal effort.
  2. Duck Dives: While experienced divers may not think much of duck dives some new divers struggle a great deal with them, and having opportunity to practice them and have someone give you tips makes a great deal of difference. The duck dive is the first bit of energy used to enter the water and being as efficient as possible can make a huge difference in the dive. This is especially important for spearfisherman who need to avoid splashing at the surface when making their dive to avoid scaring the fish away.
  3. Proper breath up and breath hold: the breath hold is a large part of free diving and how to take a proper breath makes a large difference. Gone are the days of hyper ventilation because of the increased risk of blackout. Certification classes train in the pool to maximize the static breath hold and in the pool and ocean to maximize the dynamic breath hold. Proper breath up can be the difference between a 20 second breath hold and a minute + breath hold.
  4. Recovery after the dive: one of the main take aways after a certification is to understand that quick repetitive dives without a recovery increase the chances of blackout and LMC. Proper times between dives are paramount and will increase comfort on the dives as well as duration of the next dive. Many courses will also teach hook breathing which aids in recovery as soon as you reach the surface.
  5. Blackout & LMC/Samba: These are the boogy men of free diving and something that many new divers worry about. Freediving courses use training and technique to help avoid the potential of these occurring. The hope like in scuba dive training is that divers will never have to deal with this sort of emergency but training gives the divers the tools to deal with it if it does occur.
  6. Rescues and diver support: This is in relation to blackout and LMC (loss of motor control), all free diving courses cover what to do if a diver blacks out, or experiences LMC, these often times are not life threatening but can be if not supported by a buddy. The main focus is the keep their face out of the water and get them breathing.

In conclusion why should you take a freedive course, safety. It will give you the tools to be a safer more competent diver. You will have the knowledge and technique to support your fellow divers and likely improve the depth and duration of your dives. Taking my first free diver course I did not expect it to change my diving as much as it did. Also having the ability to accompany and film new divers during their classes I get to see their growth in ability and excitement about this great sport. So if you are interested in free diving do yourself a favor and take a class. If you have read any of my other post don’t worry so much about the agency focus on finding a good instructor that will provide the best training experience for you, because many if not all of the certification agencies are teaching the same things.

Riffe Stable Snorkel Review

The Riffe Stable snorkel is by far the absolute best snorkel that I have ever used. When looking at this snorkel you will notice that is is a little different from other snorkels and those differences are what makes it in my opinion the best snorkel. This snorkel it is produced by Riffe which is a very well known spearfishing company, with that being said this snorkel is amazing for any activity free diving, scuba diving, snorkeling but was designed with spearos in mind and it shows.

Lets start off with the features of this snorkel because despite it being a snorkel there is a lot of design and thought put into this piece of equipment.

  1. Tapered shape: one of the first things you will notice when holding the stable snorkel is the taper shape of the tube, instead of a standard round tube it is teardrop shaped to give it a more hydrodynamic shape in the water. While this may seem gimmicky there is almost no drag from this snorkel and i easily forget about it when I am diving with it.
  2. Oversized Purge: the purge on this snorkel is huge and makes clearing water out of the snorkel effortless, I have never had to clear the snorkel twice to get out residual water.
  3. Oversides purge reservoir: this reservoir allows for any water that is left in the snorkel after clearing to be as far from the users mouth preventing water droplets from being inhaled by the user.
  4. Backwards Facing Splash guard: This is probably one of the subtle features that most divers wouldn’t appreciate, the splash guard is backwards facing, it keeps with the hydrodynamic design and leaves a very large opening at the top of the snorkel, the added benefit of this design is that the opening is the perfect size to block with a thumb to force any residual water out the purge of the snorkel. This also allows users to clear that negative air space that is created in the tube of the snorkel.
  5. Flexible Tube: The tube of the stable snorkel is made out of a flexible plastic that is rigid enough to keep its shape but can also be folded and shoved in a pocket of a bcd if not in use.
  6. Corrugated Silicone section: This is pretty standard for most standard snorkels and is a nice feature for one that can be used for scuba diving as well as free diving.
  7. Replaceable mouth piece: this is something that is also fairly standard for most snorkels these days but being able to swap out another mouth piece if it is damaged is always a great feature.

With any design there will always be flaws that deserve improvement for the most part this is a perfect snorkel my only gripe with this snorkel is the lack luster snorkel keeper and the sub par mouthpiece. Both of these are easily replaced or swapped but I wish that they just used the same snorkel keeper that Riffe Uses on their J-tube snorkel. And the mouthpiece while not the worst I like it better than aqualung mouthpieces i just din’t find it as comfortable as I would like.

The last thing worth noting is the price, for a semi-dry snorkel the Riffe Stable snorkel is a little expensive but if you factor in all the features I think it is well worth the value. Standard retail pricing in the US for the Stable Snorkel is about $52. If you are in search of a new snorkel and you are tired of the basic bargain bin snorkels but don’t need the fancy dry tops check out the Riffe Stable snorkel I assure you it will be the best purchase you have made on dive gear.

Snorkels: More Than Just a Tube and a Mouthpiece

The snorkel is probably one of the most under appreciated of the basic diving equipment, especially by seasoned divers. The purpose of the snorkel of course is to allow the diver to breath face down in the water without waisting air from the tank. Many divers will remember that snorkels are required during the open water certification, mostly for surface skills like the snorkel regulator exchange and skin diving skills. Beyond these many divers find little use for their snorkel, I have met quite a few divers that have abandoned their snorkel because of how annoying it can be, they also dive primarily off boats and do not see the value in snorkels.

First lets analyze the different styles of snorkels and put an optimal use for each style.

  1. J-Tube Snorkel: This is the most basic form of a snorkel it is usually a single piece of silicone or plastic with a silicone mouthpiece shaped like a J. These tend to be the least expensive option because they do not include a purge valve. This type of snorkel while functional for scuba diving is more ideal for snorkeling or free diving.
  2. The Purge Snorkel: This is usually the most common style for snorkels for diving they usually have a long tube made of some sort of plastic, connecting to a silicone corrugated section then a purge and mouthpiece. These are ideal for diving because the corrugated section allows the snorkel to be out of the divers face while it is not in use. Most if not all snorkels in the following categories will have these features with additional features added on.
  3. Semi Dry Snorkel: These are almost identical to the standard purge snorkel with the exception that they will have a splash guard on the top of the snorkel. The splash guard is a piece of plastic that will prevent water from coming directly into the snorkel if a wave splashes over the top. The semi-dry snorkels are not air tight they will fill with water just like a standard purge or j-tube snorkel. These are becoming more popular for diving, as more brands are phasing out the standard purge snorkels for semi-dry.
  4. Dry Snorkel: The dry snorkel like the semi dry has all of the same features as the purge snorkel with the exception of the dry top mechanism. This mechanism is usually some kind of bobber on a hinge that will seal the snorkel if it is submerged underwater preventing water from entering from the top of the snorkel. These snorkels are most ideal for people doing mostly snorkeling, this is because if a diver is using it and their mouth is not on the snorkel it will fill from the mouthpiece and function just like the purge and semi-dry snorkels. The dry snorkel is usually a moderate price increase compared to most other snorkels.
  5. Travel Snorkel: The travel snorkel is once again featuring many if not all of the same features of the purge snorkel with the added benefit of being made entirely out of silicone, or with additional silicone sections to be made flexible and foldable to be kept in a pocket for emergencies. These tend not to have any additional features like the dry or semi- dry tops but some will. If you are a diver that is not a fan of snorkels but understands they can be useful in certain situations this is the ideal snorkel.

Keep in mind that for the purpose of diving, snorkeling, or free diving any of these snorkels are functional, but there are situations were one of these may be more suitable for the situation than the others. personally i have separate snorkels for different activities like i have different mask and fins for different activities. I have a j-tube that I use for free diving and spearfishing, and a hybrid purge/semi-dry/travel snorkel for diving. And for those that may be wondering or reading this to figure out what snorkel is best, personally i would recommend the Riffe stable snorkel, it is a bit expensive but it is a great all around snorkel, good for free diving, scuba diving and snorkeling. I will be sure to do a review in the near future.

Simple silicone snorkel keeper
this is what you want, Never
loose a snorkel again.

The good news with snorkels is that for the most part between brands they are all about equal, each brand makes some of each style and i wouldn’t personally rank any brand of snorkel higher than any other. They are a pretty simple piece of equipment that is pretty hard to mess up. My only gripe about any snorkel on the market is the keeper, or the clip that attaches the snorkel to the mask. I have yet to find any with the exceptions of some j-tube snorkels, that I like or trust to keep my snorkel on the mask permanently. I understand that it is convenient to disconnect the snorkel from the mask and store the mask back in the box but at the risk of having to buy a new snorkel i would rather permanently or be it semi permanently attach the snorkel to the mask with a proper keeper. So do yourself the favor and when you buy a snorkel ditch the plastic keeper that is attached to the snorkel and replace it with a silicone keeper like this one and you will never loose your snorkel again.

Why I Dive With My Alternate Air Source on the Left

While it may not be the traditional set up for a scuba regulator, I find it just makes more sense to have the alternate air source on the left and not the right. The alternate air source, safe second or octopus whatever you prefer to call it is typically set up on the right side of the first stage and I think that it is something that most divers just accept. But if we really look at the design of regulators and alternate air sources I think it is more functional to be on the left.

Before we get into why I think it should be on the left let me put a couple things out there that not all divers will agree with largely because of their training. And if you disagree with me that is fine I think all divers should dive with the set up they are most comfortable with.

  1. There is nothing that says the alternate air source has to be on the right side. No training agency specifically states which side the alternate has to be on for recreational diving. Yes it is most commonly on the right but I think that is just because thats now it has always been.
  2. The alternate being on the left does not change the process of sharing air. You still pull the alternate from the keeper, clip or pocket, clear it from under your arm, give it to your buddy and make contact with your buddy.
  3. The alternate air source is for my buddy. I do not believe in donating my primary to a panicked diver or a diver that is out of air. The hose for the alternate is designed to be longer so a buddy can use it, and I shouldn’t have to breath off a less tuned regulator because my buddy was not paying attention to their air.
  4. Overhead environment, A majority of my diving occurs in California with the kelp forest and there are times where going straight up while sharing air can cause more problems so an ability to swim comfortably with a buddy who is using an alternate air source is very handy.

My first reason for diving with my Alternate air source on the left is no kink in the hose when sharing air. Because of the orientation of the regulator in order to share air with a buddy (if oriented on the right) the hose has to kink, or bend back on itself reducing the length of the hose, this also makes it pull out of the divers mouth and honestly a little awkward. It is also common to avoid this kink for divers to present the alternate upside down to their buddy which for some alternates can cause them to leak water, or not work at all, often making the situation worse. By placing the alternate on the left these problems are all resolved, the hose does not kink, it does not have to be given upside down, and the divers are allotted appropriate space.

My second reason for placing my alternate on the left is body positioning for sharing air. The traditional position (for PADI at least) is to make contact with your buddy once air is being shared by linking right arms. This is all well and good if you are going straight up but if you need to swim out from under something like a dock, boat or kelp, it can be a little awkward. Now with the alternate on the left this can still be done, but I prefer to grab onto the bcd with my left hand when I am donating air so i can help control their buoyancy with the right shoulder dump, and give the receiver both hands free to manually inflate at the surface while I am still holding onto them, this avoids any bumbling at the surface and I can use my buoyancy to help them stay afloat until they are inflated without losing contact. I understand that this may impede my ability to deflate as we ascend because my left hand is occupied but I also dive a drysuit so I am raising my left arm anyways to deflate.

My third reason is kinda over arching of all of these, it comes down to training. One of the biggest reasons people stick to the alternate on the right is because of the fear that is instilled upon them that another diver is going to run out of air and pull their primary out of their mouth. While the logic behind this appears to be sound, a panicked diver is looking for a working regulator will go for the one that they see is working, I believe that is a failure on the part of their instructor. I have been diving for almost 20 years with 1000+ dives and never have I once seen a diver grab a regulator out of my or anyone else’s mouth. I know for sure that my students were trained better than that to endanger another diver. The alternate is made a bright color for a reason so it is visible for the other divers to find in an emergency. I have been on dives were divers have run out of air and each time they either signal to me or grab my alternate because thats how they were trained. If you train someone to pull a regulator out of someone else’s mouth then they will and that could cause a whole other mess of problems.

While I personally prefer to have the alternate on the left this is my own opinion, I believe that the benefits of having it on the left are much higher than having it on the right. With that being said I also believe that personal equipment should be set up to each divers personal preferences and if this convinces some divers to try it out on the left great but I understand that those of us that prefer our alternates on the left will remain a minority. I hope that this has been enjoyable and maybe made people question why their regulators are set up the way they are.

Tips for Finding the Perfect Fins

For diving fins are an integral part of how we move around underwater they are one of the most efficient ways to propel ourselves with all of our gear on. While there is no perfect science for finding fins this will cover some considerations in determining which fins will best suit your diving style. This will be more handy for divers looking for their first set of fins but could also be helpful for divers looking to replace an old pair of fins.

First consideration: full foot or open heel?

Full foot fins are generally regarded as snorkeling fins but are often used as diving fins for warm water. They are usually a bit smaller than traditional fins, use a full foot pocket with heel, and usually are a bit lighter and cheaper than open heel fins. These are a good option for someone who only plans on doing warm water diving, they will not keep your feet warm enough for cold water diving. The sizing for these fins usually is a range of shoe sizes (7-8, 9-10, 11-12 etc…) this will vary with each brand.

Open heel fins are just what they sound like they have a foot pocket with no heel and a strap to keep the foot secure. These fins are almost always used with booties. They are generally a little bit more robust in the blade and the foot pocket to accommodate the boot, and can cost a little more. The open heel fin is the ideal fin for diving because of its versatility, despite the extra weight can be used in warm or cold water by going to a thinner or thicker boot, feet are also something that we need to worry about overheating while diving so wearing a thick boot in warm water isn’t an issue, except for travel weight. Open heel fins can also have a variety of different straps for the heel ranging from rubber or silicone adjustable with clips for quick disconnect, to silicone, bungee, or spring straps that are usually at a set tension and used for easy removal. This can effect the cost of the fin but can also usually be changed so if you would like to upgrade to spring style straps that is possible. The sizes of the open heel fins is much more general usually ranging from XS to XL but with the adjustable strap or spring strap able to accommodate a wider variety of foot sizes.

Second Consideration: Comfort.

What you want to avoid when buying fins.

This is the most import step in finding the right fin, comfort should be your primary objective because if its not it will make the experience unbearable like going on a hike in dress shoes. Depending on which style of fin you decide to go with you will be next trying them on, if you are getting an open heel you will need to find a comfortable bootie first. For the full foot fins you want to make sure that when in the pocket your foot is secure and not shifting around, too much space could lead to rub spots that cause blisters. You also don’t want the foot pocket too tight because it may cause cramping in the foot. Consider trying out different brands if possible because their foot pockets and ranges of sizes will differ. For open heel fins it will be a very similar process you want to try on different sizes and make sure that the bootie fills the entire pocket you should not have any gaps when worn, gaps can cause the fin to move and shift on the foot and work less efficiently. For people with small feet make sure that the heel strap is not completely maxed out, sometimes this can still not be enough and the fin can fall off under heavy kicking. Check and make sure that the foot is not experiencing and squeezes or pressure points from the pockets these can become uncomfortable and possibly cause cramping, sometimes due to the heel strap being to tight. For both the full foot and the open heel make sure to extend the leg and kick with the toes pointed to replicate the position your foot will been in while diving this will be a more accurate portrayal of how the fin will feel. Consult with the sales person if you are having trouble determining if it is a good fit, but ultimately you will feel if it is comfortable or not.

Third Consideration: soft or stiff blade?

The softness or stiffness of the fin blade will differ from style to style and most brands will have a range to accommodate all styles of divers. Soft blades have a lot of flex to them and are much easier to kick but do not provide a great deal of power. With the soft blade it will not be as obvious that you are kicking a fin and will feel like a more fluid motion. Softer blades are most efficient with the flutter style kick. These are generally popular with newer divers, divers with injuries, or divers that may not have the best kicking form because they are more forgiving and require less strain. Stiff blades will provide more resistance when kicking and have increased power to the kicks, you will be aware that you are kicking. These fins can be a little heavier and sometimes shorter, becoming very popular in the technical diving space because of the ability to maneuver and push a diver with more equipment. These blades work best with some form of frog kick, but can be efficient when the flutter kick is used as well. This fin is best for divers that are used to kicking and have stronger legs and a good kicking form to maximize their efficiency. There are also a variety of fins in-between soft and stiff, like stated before focus on comfort first if you are a new diver whatever you start with will become your normal.

For divers replacing an old pair of fins, I generally suggest sticking with a fin that is roughly the same stiffness or softness as the last pair. If you have been diving that fin for a while it will be an awkward transition going from soft to stiff and vise versa. If you have not been diving in a while and don’t remember how soft or stiff your fins may have been it shouldn’t matter that much.

Split fins: these are fins that are just what they sound like split down the middle of the fin leaving two fins instead of a single blade per foot. The split fin is very efficient in how they work channeling the water straight back on both the up and down kick. A majority of the time the split fin is a very soft fin, ideal for divers that may have a injury that could affect their kick. While very popular for a while new fin designs have found ways to maximize efficiency of the fin with out the split, so they are becoming less common.

Fourth Consideration: Color.

Like all other dive equipment most fins will come in a variety of colors to allow divers to personalize their gear. The color of the fin will not affect its performance, so in reality it doesn’t matter but some divers will choose a particular set of fins over another because of the color option. I recommend agains this but if you need to match your gear have at it. Most fins will offer at least the basic 3 colors (black, blue, yellow) but with new styles more colors are becoming popular (teal, pink, purple etc…) Fins are a great way to identify other divers underwater and having a different color will make you more recognizable. Some more tech oriented fins will often only be offered in one color usually black, but many divers will write their names on them to make them identifiable.